

 by
by 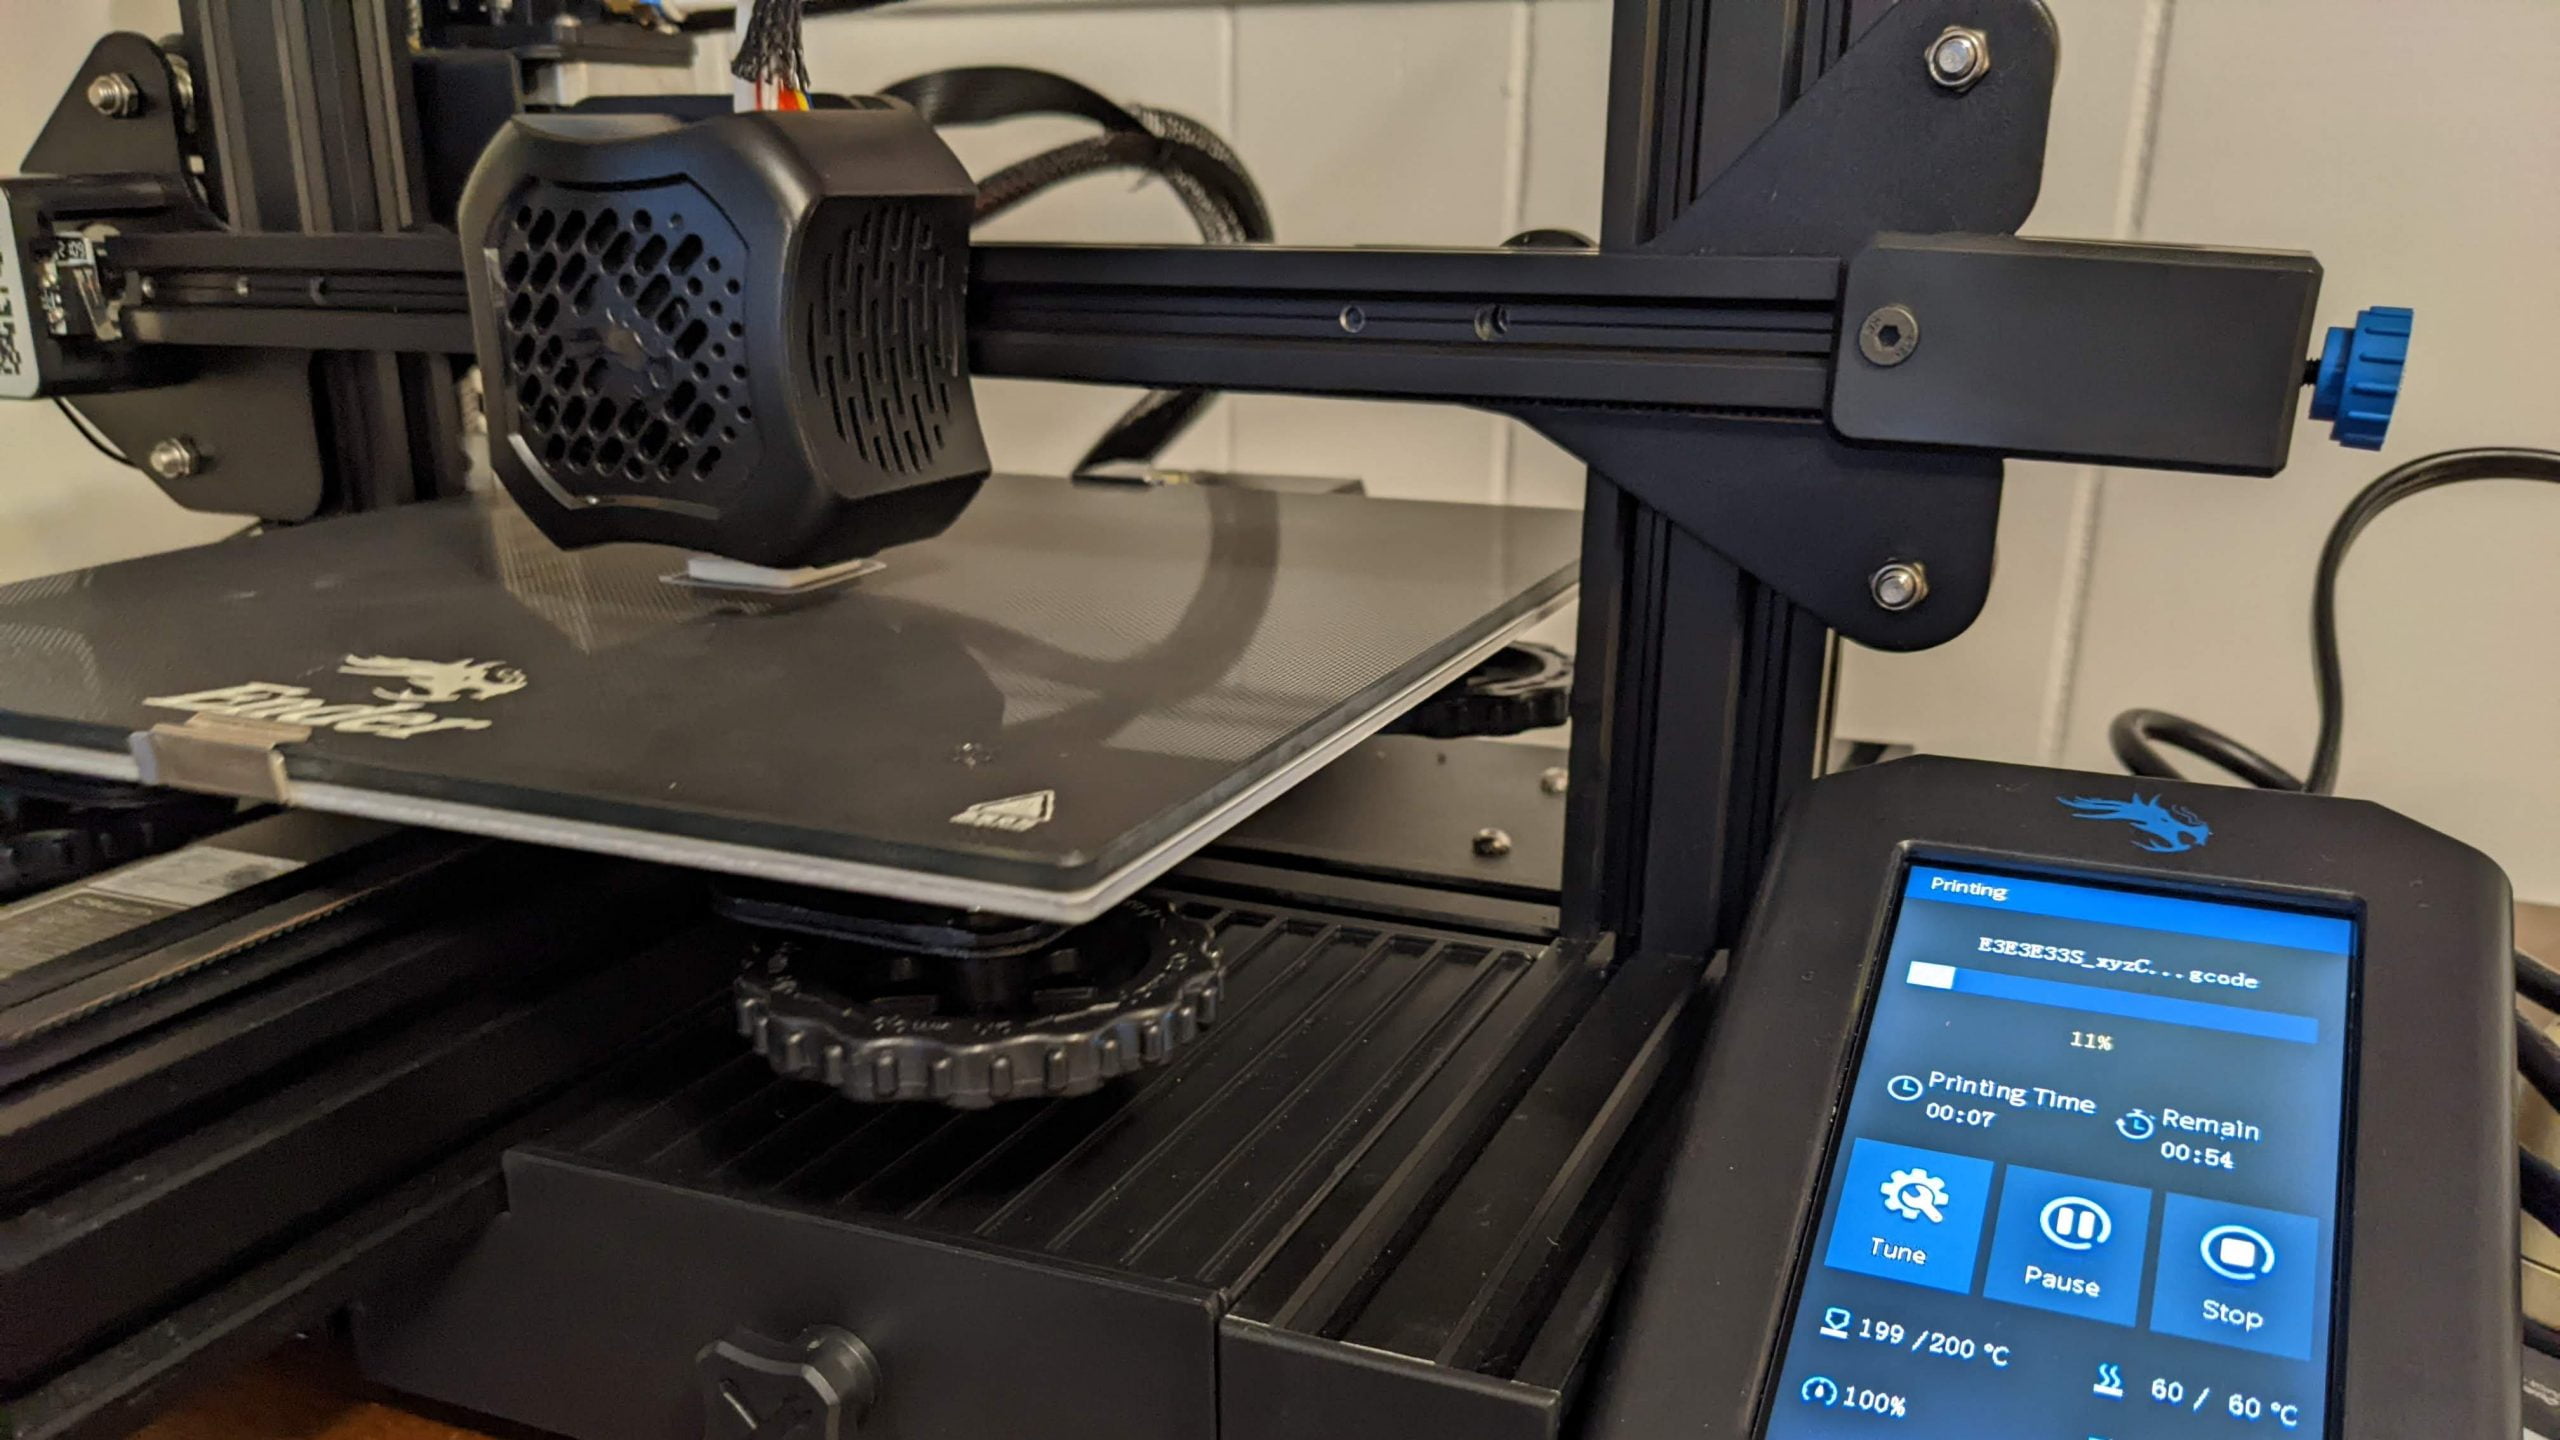
3D Printing is a hobby that I’ve never really gone in-depth with. Sure, I’ve printed some small things on a 3D Printer before, but that was a long time ago, and I didn’t get too much freedom with what I could make. That finally changes because I have a Creality Ender 3 V2 with me and we’re gonna take a good look at the cool features and usability of this thing. Let’s take a look.
The Design is Similar to the Creality Ender 3

Before we take a look at the design, I just want to point out that I do have a few upgrades on my Ender 3. Specifically, I have a TH3D EZABL Pro, upgraded bed springs, and a Creality Enclosure. I’m also running the TH3D Custom Unified 2 Firmware on the printer because of the aforementioned EZABL.
However, I’ve spent a couple of weeks with the printer before doing the upgrades, so I have a good idea of what it was like when it was still in a completely stock configuration. Now with that out of the way, let’s take a look.
Physical Aspects
The print volume is 220x220x250mm and has some unique characteristics that I haven’t seen in a 3D Printer at this price point before. It has a unique LCD screen with a knob that lets you see the stats of your printer in color. It’s an interesting feature that I never would have expected to need. Being able to see the clear text is really useful for people who cannot read a small monochrome display. The display is 4.3in and it’s handy because the menus are clear and laid out nicely.

The filament location, like the Ender 3 V1, exists at a spot where I don’t necessarily like it. It can cause some strain on the filament and scratch against the Z-Axis screw. So, I printed a little filament guide that slides in next to the extruder, and it prevents the filament from getting stripped on the Z-Axis. This is one way to avoid filament damage, but I would still recommend mounting the filament elsewhere, like on the side.
Controlling Your Prints
The 3D Printer can be interfaced through the LCD screen mentioned earlier. You can use the USB port to interact with a computer or OctoPrint. I personally use OctoPrint on my own Ender 3 V2 and I’ve been super satisfied with it. I’ll be writing a few articles about OctoPrint and will be discussing why I think every 3D Printing hobbyist should use it.

Creality has made a 3D Printing bed that I am a fan of. It’s a glass bed that is easy to use and manage when 3D Printing. I say that because it works in a special way. See, when you’re printing something on the “grippy” side and the bed becomes hot, the print sticks and grips. Once your bed cools down, it’s easy to take off your new print.
I’ve really liked this bed, and have not been dissatisfied. I may eventually upgrade to an EZFlex PEI build plate because it seems even easier to use, but I’m in no rush because I’ve been happy with the stock bed as is.
Bed Leveling on the Ender 3 V2 is NOT FUN

Now let’s talk about bed leveling. Yes, I am a noob when it comes to 3D Printing, but from all of the guides that I’ve found online about leveling the bed, I was only able to dial it in a couple of times correctly. Then I ended up giving up after my failures and bought new bedsprings and an EZABL Pro.

The bedsprings arrived first and made a big difference. I had to adjust the Z offset on the stock firmware for each print, but that was because I forgot how to save it. But when the EZABL arrived, it made a huge difference and it was something I didn’t have to think about again.
Controlling the 3D Printer Was No Problem

As mentioned earlier, I use OctoPrint with my 3D Printer so that I can manage it from anywhere in my house. I use Ultimaker Cura for my slicing software because of it being free, open-source, and easy to use. I use most of the default settings and it is easy to change them if you have to. PrusaSlicer is also an option for those who prefer it. It has a dedicated Ender 3 V2 Preset for configuration.
You do have the option to use Creality’s own slicing software, Creality Slicer. This is an app that is based on Cura and the interface looks extremely similar other than some of the branding and colors. I would recommend Cura because of its updates and overall usability, but you can’t go wrong with either one. They are both well optimized and easy to learn.

I don’t use any special presets or modes with my printer. Cura lets me easily change my printing settings with no fuss. I can choose from quality presets and also specify options if I want to add supports or a raft. While Ultimaker Cura does not have an actual Ender 3 V2 Preset on its own, I use the Ender 3 Pro preset and have printed without issue.
Time for Some Test Prints!
It’s finally time to see what kind of things you can print with the printer. I ran three tests after using it for a while. Those tests are the XYZ Axis Calibration Cube, the infamous 3D Benchy test, and a design of a figurine I found on Thingiverse.
XYZ Axis 3D Printer Calibration Cube

The Calibration Cube was printed with no issues. The print was clean and successful. While the print itself is not anything special, it was still something to see how the individual axis motors are working.
3D Benchy: The 3D Printer Stress-test

My 3D Benchy test was a success and mostly flawless. There were a couple of minor defects though, one of which was mostly related to printer vibrations. This can supposedly be fixed through the possible extruder settings that can be adjusted such as retraction and E-steps. I have not tweaked the settings so that I can easily upgrade to the aluminum TH3D Extruder. That will be coming in the mail in a few days at the time of writing.

There were some other minor drooping errors, but those were possibly bridging settings that I need to tweak. But it also always depends on a variety of factors. For the most part, this print was successful and it had minor defects, but none of which are completely unfixable. I printed it with a 0.2mm layer size, but I suggest printing at 0.16mm for slightly better quality.
Rock Chungus

When I showed the “Rock Chungus” test print to my friends, they got a real kick out of it. They were both confused by the model and enlightened by it. It was printed with only a couple of minor defects. The filament seemed to be stringing at the points when it would be an arch-style layer, meaning that filament is going off of the previous layer with no support.
Other than minor stringing issues, it printed with no problem. The quality was the default 0.2mm layer size because I mostly both forgot to change it and I didn’t have time to print at a higher quality.
Should You Buy the Creality Ender 3 V2?
I think that this printer is definitely a great printer if you want to get started in the world of 3D printing. I had very little experience going into this printer and it was easy to figure out after watching a couple of videos on YouTube. Once you know what you’re doing, I wouldn’t see how this printer could disappoint you.
If you do get the Ender 3 V2, I recommend watching some YouTube videos to see some upgrades and new features you can do with it. Other than Chay Chay Tech Time, YouTube channels like The Edge of Tech and 509 Drone will also provide good how-to content on basic upgrades, such as the extruder or PTFE tube. I recommend that people upgrade the extruder and Bowden tube if they want to print in other materials (PETG, ABS, TPU).
Overall, you can’t go wrong with this printer. I recommend it to anyone who likes 3D Printing and would like to have a printer at a low cost that performs extremely well. If you’re interested in buying it, you can buy it on Amazon.com or the Creality website.
To learn more about 3D Printing, you should check out my podcast, Chaney’s Tech Talk. You can listen to it on Apple Music, Spotify, Google, Stitcher, and Alexa. If your phone battery starts to degrade, take a look at this Amcrest Power Bank that I reviewed. Secure your online data with Nextcloud and learn more about its features. Extend the life of your Moto G7 with Custom ROMs. Subscribe to our official newsletter for new technology updates and reviews from Chay Chay Tech Time.


